Basic Functions

Basic Functions Archive [ Page v0.9 ]
Basic Functions of Fast Dial, older versions. Guides are listed below.
Note: Items marked with "n/a" are in preparation, and will be available soon!
Looking for the Latest FD Docs?
- 0 votes
2.22b
..
- 0 votes
Setting the Fast Dial Folder as Home in Bookmarks
A number of problems have arisen recently with users finding that they were in the incorrect Folder in Bookmarks.
(Version 2.22b and earlier)
Here are some links to examples of this problem
-------------------------------------------------------------------
The way to reset the Fast Dial Folder is the following:
Go Bookmarks/Organise Bookmarks/Bookmarks Menu
You should then be able to see the Fast Dial Folder
Right click on the folder and select Fast Dial Make home

This will as it were put the Root Folder of Fast Dial in the correct Folder in Bookmarks.
---
telega is working in the next Version of Fast Dial to find a way to avoid this particular problem
- 0 votes
2.24
..
- 0 votes
Fast Dial Version 1.x and Version 2.x up to Version 2.9
The below will all be Tutorials for Version 1.x and 2.x up to Version 2.9
- 0 votes
FD Installation
 2. Click "Install" on the popup. (Or "Allow" if the top bar shows up)
 3. After installation, click "Restart" Firefox
 When firefox opens, you should see the same tabs open as before the restart.
___________________
When firefox opens, you should see the same tabs open as before the restart.
___________________
 Default - This can sometimes produce a low quality thumbnail in FF2.
Java - Usually better quality - Uses more system resources. (Must have Java installed)
Userlogos.org - No Longer Available (Do NOT Use!)
Recommended Scaling method: "Default"
___________________
By default, Fast Dial will display on all new tabs, it will look similar to this:
Default - This can sometimes produce a low quality thumbnail in FF2.
Java - Usually better quality - Uses more system resources. (Must have Java installed)
Userlogos.org - No Longer Available (Do NOT Use!)
Recommended Scaling method: "Default"
___________________
By default, Fast Dial will display on all new tabs, it will look similar to this:
 So, go ahead and open a new tab to see Fast Dial!
Ways to open a new tab include:
1. CTRL+T
2. File > New Tab
3. The New Tab toolbar button.
So, go ahead and open a new tab to see Fast Dial!
Ways to open a new tab include:
1. CTRL+T
2. File > New Tab
3. The New Tab toolbar button.
 _____________________________________
Having trouble with the Fast Dial installation? Troubleshooting information is available here: Link.
Or, you can get support in the forum here: Link.
_____________________________________
Having trouble with the Fast Dial installation? Troubleshooting information is available here: Link.
Or, you can get support in the forum here: Link.- 1 vote
Adding Sites/Cells to Fast Dial
- 2 votes
The Toolbar Button
____________________________________________________________________________
As of Fast Dial Version 2.9 the following option was added:
FD toolbar button is automatically added to toolbar upon installation (only once).
If for some reason you do not want the Fast Dial Toolbar to be visible then simply:
Right-click Firefox navigation bar and choose "Customize..." from the context menu - a window opens. Then drag-n-drop Fast Dial toolbar button from the navbar away into this window.
The button should never appear again.
______________________________________________________________________________
For all earlier Version of Fast Dial 2.x and Fast Dial 1.x the following information is applicable
_______________________________________________________________________________
When you first load Fast Dial into Firefox a Fast Dial Icon Toolbar Button is automatically loaded at the same time.
However in order to make the Button visible in Firefox you have to do the following.
Right click on the Menu or Navigation Toolbar
And you will see:

Click on Customise and you will see the Fast Dial Icon in the Customise Toolbar window.

Put your cursor on the Fast Dial Icon and drag and drop it onto the Menu Toolbar.
A handy place to put the Icon is far right on your Menu Bar at the top right of your screen.

Once you have placed the Icon where you want it, close the Customise window.
Once you have the Fast Dial button in place it is very handy.
Left mouse click on the Fast Dial Button opens Fast Dial in the present Tab.
Centre mouse click on the Fast Dial Button and Fast Dial opens in a New Tab.
This is a very useful function when you have lost sight of Fast Dial.
One click on the Fast Dial Button and Fast Dial should re-appear.
[There is a small problem using the toolbar button with FD 1.90 in FF3 see here ]
- 1 vote
FD Preferences - Explained
- 1 vote
Setting a Background Color/Image
- 1 vote
n/a - Keyboard Shortcuts
- 1 vote
Adding Sites/Cells to Fast Dial
Please choose which version of Fast Dial you are using:
(To find this information, please go to the firefox Addons window (Tools > Addons), the versions is printed to the right of the title)
View Guide for Fast Dial v1.x
The Fast Dial Versions 1.x were designed to make it very simple matter to add a Web Page to Fast Dial.
There are a number of different ways of doing this. Please choose which way you prefer:
Context (Right-Click) Menu on the Webpage (Most Common)
Once you have arrived at the Web Page that you want to save, right click on the Web page and you will see the Context Menu appear as in the picture.
Click on "Add to Fast Dial" and you have saved the Page.

Now return to Fast Dial, for example by clicking on the Fast Dial Toolbar Button, (or CTRL-T), and you will see that you now have created a Dialing Cell in Fast Dial.

If you now wish to alter the wording that appears at the base of the cell, then right click on the cell again and in the Properties Menu change the wording in Title to suit your own preference. Then click OK.
You will see now, that if you click on the cell itself that you have created, that it takes you directly you to the Web page.
This is how Fast Dial works.
It is that simple.
It is worth however remembering that when you use the command "Add to Fast Dial" in the Context Menu, Fast Dial saves your Web Page to the next available Cell in the the current Fast Dial Page.
So if you have you have a number of Groups it is worth making sure you are in the appropriate Group before you Add your Web Page to Fast Dial.
The Group name will be visible in the Tab.
Context (Right-Click) Menu in Bookmarks
If you already have a number of Bookmarks stored in Firefox, you can click on Bookmarks on the Firefox Toolbar and then go to the Bookmark item that you wish to save to Fast Dial. (see picture)
Right click on the item that you wish to save and then click on "Save to Fast Dial" on the context menu. (see picture)

The item will then appear in the next free cell on your Current Fast Dial Page
This is very useful function, especially if you have a lot of previous Bookmarks, for it will enable you to save them to Fast Dial very conveniently.
Context (Right-Click) Menu on a Tab
Should you wish, you can also right click on a Tab, and use the Context Menu and Add to Fast Dial method as described above.

Directly in Fast Dial
This is perhaps the most laborious method but it has it's uses.
Open the Properties Menu and paste or enter manually the address of the URL that you wish to enter into Fast Dial.
You may also enter the Cell name in the Title Field.
Then press OK

After the cell has refreshed this will be the result:

View Guide for Fast Dial v2.x
The process of adding Items to FD2 is quite different than FD1.
FD2 is based around bookmarks. So it stores all the cells in a bookmark folder named "Fast Dial".
There are a several ways of adding items to FD2. Please choose which way you prefer:
The Bookmark Method
This method replaced the "WebPage Context Menu" method from FD 1.x
Since FD2 is based around bookmarks, you can use Firefox 3's "Bookmark Star" located in the address bar.
First you must go to the web site which you want to add to Fast Dial.
In this example i visited www.google.com
Once you are at the site do the following:
1. Double-Click the bookmark star.

2. Click the Down Arrow beside the "Folder" field.
3. Select the "Fast Dial" Folder.
4. Click "Done"

You're done! The site has been added to the first empty cell available in FD.

Open a new tab to see Fast Dial with the new cell.
Ways to open a new tab include:
New Tab button
CTRL+T
File > New Tab
Directly in Fast Dial
To add an item manually to Fast Dial follow these steps:
1. Open an empty cells' Properties box.
You can do this by:
Click the little gear button on top of a cell. (Note: There is a delay on the display of the top buttons)

OR
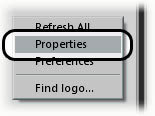
Right-click an empty cell and click Properties.
2. Fill in the URL field with the address of the website.
You may also fill in the title (Optional)

3. Click "OK"
You're done! Your wite should now be in the cell.
______________________________
Having trouble with setting a background in FD? Troubleshooting information is available here: Link.
Or, you can get support in the forum here: Link.
- 0 votes
Cell Properties in Fast Dial 1.x (in progress)
The Cell Properties Menu in Fast Dial 1.x effects many things.
-----------------------------------------------------------
The below is applicable to Fast Dial 1.x
If you right click on a cell
Or if you right click on an empty part of the Fast Dial screen and choose Add, you will see this Menu

___________________________________________________________
- 1 vote
Cell Properties in Fast Dial 1.x
The Cell Properties Menu in Fast Dial 1.x effects many things.
-----------------------------------------------------------
The below is applicable to Fast Dial 1.x
If you right click on a cell
Or if you right click on an empty part of the Fast Dial screen and choose Add, you will see this Menu
___________________________________________________________
- 0 votes
Creating Groups (Fast Dial 1.x)
In Fast Dial Version 1.x the word Group is used.
In Fast Dial Version 2.x the word Folder is used
-----------------------------------------------------------
In Fast Dial Version 1.x it is possible to make a group from any empty cell that you have on any Fast Dial Page.
To make a Group it is first necessary to right click on the cell you wish to use to form a group:
Click on Properties

You will then see the Cell Properties Menu.

If you click on the small box marked Group and you see a tick appear this means you are about to create a Group.
You can also name the Group by filling in the Title field.
Click OK
You now have now created your Group.

Click on the group cell that you have just created and you will find yourself within your Group, with the tell-tale back arrow cell in the Top left corner.
The Title written at the base of the Back Arrow Cell will be the name of the Group.
This name will also appear on the Tab.

Should you wish at any time to exit the Group that you are in, go to the top left corner and click on that cell with the Arrow in it and you will find yourself back on the previous page, where your Group Cell is located.
The only page that will not have that cell with a back facing arrow in it will be your First Root Folder Page.
________________________________________________________________
The small Properties window allows you to set many other different parameters for your new Group.
These options will be dealt with in detail in Cell Properties.
________________________________________________________________
It is useful to know how to move a cell from one Group to another.
_______________________________________________________________
Adding a cell to a group
Here we have a choice of three groups and one free cell.
Let us add this cell to Group 2

This is easy enough to do
Hold down the CTRL Key and drag and drop your cell onto the Group of your choice

The cell will disappear into the Group of your choice
Click on the Group Cell and you will find the Cell that you have just added.
________________________________________________________________
Moving a cell out of a Group
If you wish to move a cell "backwards" out of it's Group to the previous Page then all you need do is to drag your cell to the top left cell, that is the one with the arrow on,

and drop it.

It will disappear from view.
But if you click on the arrow:

you will discover that your cell is now on the previous page.
________________________________________________________________
These two methods of moving cells within groups that have been described above can of course also be used for moving cells which are designated as Group cells. So Groups can be moved around within other Groups.
This is very useful if you decide to re-shuffle your overall Fast Dial layout.
- 1 vote
Creating Groups Fast Dial 1.x
In Fast Dial Version 1.x the word Group is used.
In Fast Dial Version 2.x the word Folder is used
-----------------------------------------------------------
In Fast Dial Version 1.x it is possible to make a group from any empty cell that you have on any Fast Dial Page.
To make a Group it is first necessary to right click on the cell you wish to use to form a group:
Click on Properties
You will then see the Cell Properties Menu.
If you click on the small box marked Group and you see a tick appear this means you are about to create a Group.
You can also name the Group by filling in the Title field.
Click OK
You now have now created your Group.
Click on the group cell that you have just created and you will find yourself within your Group, with the tell-tale back arrow cell in the Top left corner.
The Title written at the base of the Back Arrow Cell will be the name of the Group.
This name will also appear on the Tab.
Should you wish at any time to exit the Group that you are in, go to the top left corner and click on that cell with the Arrow in it and you will find yourself back on the previous page, where your Group Cell is located.
The only page that will not have that cell with a back facing arrow in it will be your First Root Folder Page.
________________________________________________________________
The small Properties window allows you to set many other different parameters for your new Group.
These options will be dealt with in detail in Cell Properties.
________________________________________________________________
It is useful to know how to move a cell from one Group to another.
_______________________________________________________________
Adding a cell to a group
Here we have a choice of three groups and one free cell.
Let us add this cell to Group 2
This is easy enough to do
Hold down the CTRL Key and drag and drop your cell onto the Group of your choice
The cell will disappear into the Group of your choice
Click on the Group Cell and you will find the Cell that you have just added.
________________________________________________________________
Moving a cell out of a Group
If you wish to move a cell "backwards" out of it's Group to the previous Page then all you need do is to drag your cell to the top left cell, that is the one with the arrow on,
and drop it.
It will disappear from view.
But if you click on the arrow:
you will discover that your cell is now on the previous page.
________________________________________________________________
These two methods of moving cells within groups that have been described above can of course also be used for moving cells which are designated as Group cells. So Groups can be moved around within other Groups.
This is very useful if you decide to re-shuffle your overall Fast Dial layout.
- 0 votes
FD Preferences Explained
Getting to know the Fast Dial Preferences Dialog Box..
Note: The way the preferences will be explained is by presenting a numbered and color coded image the explanations can be found below the image.
Please choose which version of Fast Dial you are using:
(To find this information, please go to the firefox Addons window (Tools > Addons), the versions is printed to the right of the title)
View Guide for Fast Dial v1.x
The Preferences window in FD1.x consists of 2 tabs.
The General tab contains some common FD settings, while the Appearance Tab allows you to customize the look and feel of Fast Dial.
Please select which part of the Preferences you would like to know more about:
The General Tab
Explanations are below the image. They are numbered and color coded in the image as well the text.
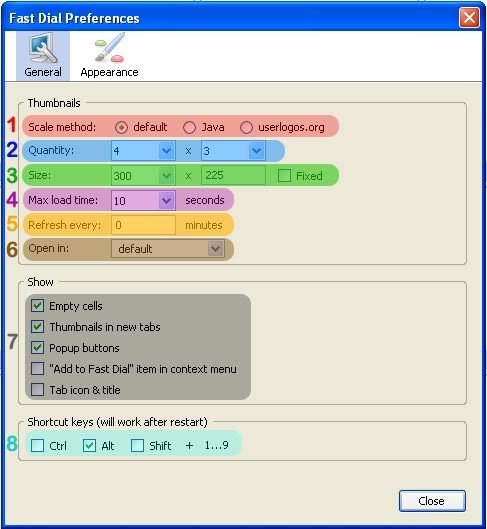
1. Scale Method - Scaling refers to how Fast Dial resizes the thumbnails.
Default - This can sometimes produce a low quality thumbnail in FF2.
Java - Usually better quality - Uses more system resources. (Must have Java installed)
Userlogos.org - No Longer Available (Do NOT Use!)
Recommended Scaling method: "Default"
2. Quantity - This setting allows you to choose how many cells will show up in your main Fast Dial Page.
# in each Row X # in each Column
3. Size - This refers to the size (in pixels) of the cells in your main Fast Dial Page.
Width X Height
4. Max Load Time - This refers to the max time to allow FD to attempt to load the site and create its thumbnail.
5. Refresh Every - This one should be obvious. Items marked as "Refresh" in their individual properties, will be refreshed at this interval.
Settings this to 0 disables automatic refreshing of thumbnails.
6. Open in - This option allows you to choose where the cells will open upon click.
The options are:
Default (Current Tab)
New Tab
Background Tab
New Window
7. Show - Check what should be shown..
"Empty Cells" - Select whether Empty Cells are displayed.
"Thumbnails in new Tabs" - Select if you want FD to be shown everytime you open a new tab. Recommended.
"Popup buttons" - Choose whether the popup buttons on top of cells are displayed.
""Add to Fast Dial" item in context menu" - Enable the "Add to FD" item in the right-click menu.
"Tab Icon & Title" - Show the FD Icon and Title in an FD tab.
8. Shortcut Keys - Choose which button should be used in accordance with numbers 1-9 to open the cell.
Alt, Ctrl, or Shift
The Appearance Tab
Explanations are below the image. They are numbered and color coded in the image as well the text.

1. Theme - Select the theme. (Seems to have no use)
2. Font - Allows you to select the font type and size used for the Cells Titles.
3. Background Image - Allows you to set a background image for your FD page. Click "..." to browse.
4. Page - Page specific color settings.
"Background" - Set the background color of the page.
"Text" - Set the text color used for the Cell Titles.
5. Color Settings - FD Color settings
"Cell" - Set the background and Border colors for all entire cells.
"Selected Cell" - Set the background and Border colors for Active (mouseover) Cells.
"Image" - Set the background and Border colors for the actual thumbnail. (Used when using transparent thumbnails)
"Selected Image" - Set the background and Border colors for the actual Active (mouseover) thumbnail. (Used when using transparent thumbnails)
View Guide for Fast Dial v2.x
The Preferences dialog box in FD2 is quite different than the one in FD1.
Tabs are still used, but the options are organized in a different manner.
The General tab contains some common FD settings, while the Appearance Tab allows you to customize the look and feel of Fast Dial.
A Help tab is also available - which contains useful links.
Please select which part of the Preferences you would like to know more about:
The General Tab
Explanations are below the image. They are numbered and color coded in the image as well the text.

1. Quantity -
This setting allows you to choose how many cells will show up in your main Fast Dial Page.
# in each Row X # in each Column
2. Size -
This refers to the size (in pixels) of the cells in your main Fast Dial Page.
Width X Height
Recommended: 300 x 225
Fixed refers to whether or not the cells will resize when firefox is resized.
If checked, instead of resizing they will remain at the set size.
4. Shortcut Key -
4. Open In -
This option allows you to choose where the cells will open upon click.
The options are:
Default (Current Tab)
New Tab
Background Tab
New Window
5. Misc. Options -
"Use Java for Scaling" - Allows you to use Java scaling, instead of the Firefox 3 High Quality Scaling.
"Show Fast Dial Page in new tabs" - Checking this will enable FD in all new tabs.. Recommended: Enabled!
"Show Empty Cells" - Allows you to choose whether empty cells are displayed.
"Show Tab Icon" - Allows you to choose whether the FD Favicon is displayed in FD Pages.
The Appearance Tab
The appearance tab is further split into three sections. They are selectable right underneath the tab..
Please select which section of the Appearance tab you would like to know more about:
Page
Explanations are below the image. They are numbered and color coded in the image as well the text.
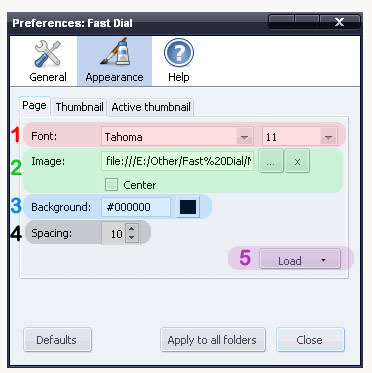
1. Font -
Allows you to choose the Font Style and Size of the Thumbnail Titles.
2. Background Image -
Allows you to set a background image for Fast Dial.
More information on this subject is available here: Link.
3. Background Color -
Allows you to set the FD Page background color.
4. Spacing -
This refers to the space between each cell.
Increasing this will make the cells farther apart from each other.
5. Load/Save -
This button allows you to export or import your Appearance settings for Fast Dial.
This way you can backup your appearance settings, or switch between themes quickly.
Thumbnail
Explanations are below the image. They are numbered and color coded in the image as well the text.
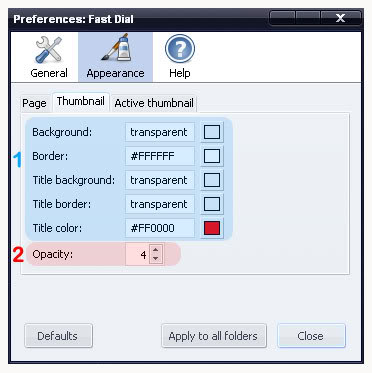
1. Color Settings -
"Background" - This sets the Background Color of All Thumbnails.
"Border" - This sets the Border Color of of All Thumbnails.
"Title Background" - This sets the Background Color of the TITLE of All Thumbnails.
"Title Border" - This sets the Border Color of the TITLE of All Thumbnails.
"Title Color" - This sets the Color of the TITLE of All Thumbnails.
2. Opacity -
This setting allows you to set the transparency ( or opacity ) of all your thumbnails.
A Lower value makes them more transparent, while a higher value makes them more opaque.
Value ranges from 0 to 10. 0 Being completely Transparent, and 10 being completly Visible.
Active Thumbnail
Explanations are below the image. They are numbered and color coded in the image as well the text.

1. Color Settings -
"Background" - This sets the background color of Hovered ( or Active ) Thumbnails.
"Border" - This sets the Border Color of Hovered ( or Active ) Thumbnails.
"Title Background" - This sets the Background Color of the TITLE of Hovered ( or Active ) Thumbnails.
"Title Border" - This sets the Border Color of the TITLE of Hovered ( or Active ) Thumbnails.
"Title Border" - This sets the Color of the TITLE of Hovered ( or Active ) Thumbnails.
2. Opacity -
This setting allows you to set the transparency ( or opacity ) of the Hovered ( or Active ) Thumbnails.
A Lower value makes them more transparent, while a higher value makes them more opaque.
Value ranges from 0 to 10. 0 Being completely Transparent, and 10 being completly Visible.
The Help Tab
Explanations are below the image. They are numbered and color coded in the image as well the text.

1. Homepage - A link to the FD Homepage.
The Bottom Buttons
Explanations are below the image. They are numbered and color coded in the image as well the text.

1. Defaults -
This should be obvious.. Pressing this button will reset all your settings to their Defaults.
2. Apply to All Folders -
In FD2 the Preferences dialog does not set optionas Globally, but only for your main FD Page.
If you would like to use the same settings for all your folders, use this button.
3. Close -
..Come'on! You know what this button does..
It closes the FD Preferences window.
- 0 votes
Fast Dial Installation
Several things you must know before installing Fast Dial:
The older, stable release is: FD v1.90.
Works with both Firefox 2 and Firefox 3.
The most current,stable release is: FD v2.11.
The 2.x version releases are only compatible with Firefox 3.
This is because some of the features of FD v2.0 require the latest version of Firefox...
If you're not yet using Firefox 3, and are able to upgrade, please do so here: Download Firefox 3.
There are several places where you can get Fast Dial..
These include:
Telega's Site,
The Mozilla Add-ons site, or
Directly from this site.
First, you must Choose a download source above ( i chose mozilla addons for this article - although v2.0 is not available there yet)
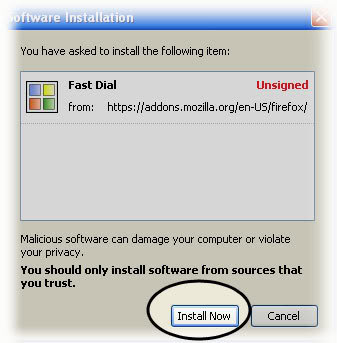
1. Click "Add to Firefox" (or similar)
2. Click "Install" on the popup. (Or "Allow" if the top bar shows up)
3. After installation, click "Restart" Firefox
When firefox opens, you should see the same tabs open as before the restart.
___________________
You will now see a window which is asking you which "scaling method" you would like to use.
Scaling refers to how Fast Dial resizes the thumbnails.
Default - This can sometimes produce a low quality thumbnail in FF2.
Java - Usually better quality - Uses more system resources. (Must have Java installed)
Userlogos.org - No Longer Available (Do NOT Use!)
Recommended Scaling method: "Default"
___________________
By default, Fast Dial will display on all new tabs, it will look similar to this:
So, go ahead and open a new tab to see Fast Dial!
Ways to open a new tab include:
1. CTRL+T
2. File > New Tab
3. The New Tab toolbar button.
_____________________________________
Having trouble with the Fast Dial installation? Troubleshooting information is available here: Link.
Or, you can get support in the forum here: Link.
- 0 votes
Setting Fast Dial Ver 1.x as your Home Page
The way each person sets up Fast Dial 1.x in Firefox will differ according to individual tastes.
(Fast Dial 2.x is different see here)
All we can do here is to look at the different options and see how to achieve them
________________________________________________________________
If in Firefox you go Tools/Options/Main you will see the following Startup Menu.

This is where you can set up how Firefox opens in relation to Fast Dial.
What is useful to realise is that "Show a blank page" in the first field is exactly equivalent to "about:blank" in the second field.

So the above set up would Open Fast Dial on Start up and also makes Fast Dial the Home Page.
________________________________________________________________
Here for example is a minimalist choice

If the choice for when Firefox/Bon Echo opens is set to blank page this will open Fast Dial when Firefox Opens.
Here there is no Home Page selected at all.
Someone with such a set-up is probably accessing Fast Dial by using The Fast Dial Toolbar Button (or CTRL-T)

A person with such a set up is probably accessing Google by another method, possibly by using the very convenient Google Toolbar Button Extension

________________________________________________________________________________________
There are other options available.
________________________________________________________________________________________
You can set about:blank as your Home page and have this configuration:

This will open Fast Dial on Firefox startup and will also allow Fast Dial to be accessed by clicking on the Firefox Home Toolbar Icon (centre mouse click opens in new tab)

or by going History/Home in Firefox or typing ALT-HOME on the Keyboard
This setup may not be so convenient for accessing Google
_________________________________________________________________
Another option is the following:

This will cause Fast Dial to show on start up, but will allow the user to access Google by clicking the Firefox Home Toolbar Button (centre mouse click opens in new tab)  or going History/Home in Firefox or typing ALT-HOME on the Keyboard
Someone using this system is probably accessing Fast Dial via the Fast Dial Toolbar Button.(or CTRL-T)
_________________________________________________________________
Another option is the following:

It is possible using the option "use current pages" to set up Firefox when it opens to show Google and Fast Dial in separate Tabs.
To set this up you need to have only the two tabs Google and Fast Dial open in Firefox, at that point you then need to click on "use current pages" in the Startup Menu.
This will save the two open tabs and will cause Firefox to always open with these two tabs.
(You can reverse the order by reversing the Tabs, if you wish)
With the set up as outlined in the Menu above, this would also mean that if you hit the Firefox Home Toolbar Button that both Google and Fast Dial should open in new tabs.

This option is rather cumbersome and does not always function perfectly , but you are welcome to try it out. ________________________________________________________________
- 1 vote
Setting Fast Dial as you HomePage in FD 2
________________________________________________________________
It would appear that the recommended "Home Page Setting" for Fast Dial 2.x is "about blank"
If that is the case the recommendations for Setting Home Page in Fast Dial 1.x can also be followed:
Setting Fast Dial Version 1.x as your Homepage
However some users have reported that using "about blank" as a Home Page setting in Fast Dial 2.x does not work.
It is not clear at the moment why this is.
If you find this to be the case for you please try using instead of "about blank" the setting:
chrome://fastdial/content/fastdial.html
----------------------------------------------------------------
There was a post by penpirate on this subject made on Userlogos, please find here:
- 1 vote
Setting a Background Color Image
Setting the background color or image of your Fast Dial is one of the most easiest things you can do.
Please choose which version of Fast Dial you are using:
(To find this information, please go to the firefox Addons window (Tools > Addons), the versions is printed to the right of the title)
View Guide for Fast Dial v1.x
1. Open Fast Dial Preferences. (Right click in FD > Preferences)
2. Click the "Appearance" Tab.
3. To set a Background Color, use the "Page" color field.
To set a Background Image, use the "Background Image" Field.

For the background image, you can either enter a URL Address to an image online, or you may click the "..." to browse for images on your computer.
You may click "Clear" when you would like the background image removed from FD.
Note: You may use tiled or pattern backgrounds, they are automatically repeated in both directions.
View Guide for Fast Dial v2.x
1. Open Fast Dial Preferences. (Right click in FD > Preferences)
2. Click the "Appearance" Tab.
3. Choose "Page" from the selection dropdown menu.
4. To set a Background Color, use the "Background" color field.
To set a Background Image, use the "Image" Field.

For the background image, you can either enter a URL Address to an image online, or you may click the "..." to browse for images on your computer.
You may click "x" when you would like the background image cleared from FD.
Note: You may use tiled or pattern backgrounds, but you must enable "Repeat".
______________________________
Having trouble with setting a background in FD? Troubleshooting information is available here: Link.
Or, you can get support in the forum here: Link.
- 0 votes
The Toolbar Button
____________________________________________________________________________
As of Fast Dial Version 2.9 the following option was added:
FD toolbar button is automatically added to toolbar upon installation (only once).
If for some reason you do not want the Fast Dial Toolbar to be visible then simply:
Right-click Firefox navigation bar and choose "Customize..." from the context menu - a window opens. Then drag-n-drop Fast Dial toolbar button from the navbar away into this window.
The button should never appear again.
______________________________________________________________________________
For all earlier Version of Fast Dial 2.x and Fast Dial 1.x the following information is applicable
_______________________________________________________________________________
When you first load Fast Dial into Firefox a Fast Dial Icon Toolbar Button is automatically loaded at the same time.
However in order to make the Button visible in Firefox you have to do the following.
Right click on the Menu or Navigation Toolbar
And you will see:
Click on Customise and you will see the Fast Dial Icon in the Customise Toolbar window.
Put your cursor on the Fast Dial Icon and drag and drop it onto the Menu Toolbar.
A handy place to put the Icon is far right on your Menu Bar at the top right of your screen.
Once you have placed the Icon where you want it, close the Customise window.
Once you have the Fast Dial button in place it is very handy.
Left mouse click on the Fast Dial Button opens Fast Dial in the present Tab.
Centre mouse click on the Fast Dial Button and Fast Dial opens in a New Tab.
This is a very useful function when you have lost sight of Fast Dial.
One click on the Fast Dial Button and Fast Dial should re-appear.
[There is a small problem using the toolbar button with FD 1.90 in FF3 see here ]
- 0 votes